Articles
05.01.2025
Sane Minecraft server hosting
Hosting infinite minecraft servers on limited hardware
The two week minecraft phase is a phenomena that plagues and blesses the lives of gamers every year or even multiple times a year, but how often do we find ourselves keeping those old servers available for after the phase is over. How often does your friend group get caught up in how to host the server, server costs or god forbid minecraft realms.
In this article we will explore how to host servers that can be kept available for years, all on a single computer.
Vanilla Minecraft servers have only gotten more and more greedy with their resource usage in recent years. Alternatives like paper exist, that attempt to minimize resource usage while still keeping a mostly vanilla experience. However many types of servers, especially modded, still require a lot of ram and cpu. A lot of this is due to them being written in Java, where you have to preallocate all the memory that you plan to use for the Java Virtual Machine. The high CPU usage of modern minecraft servers is more inexcusable, but that's the reality that we have to work with.
The solution that I'm proposing will not suit everyone, but to those who need multiple servers available with few resources I think it's very viable. The whole idea relies on setting the servers up with a reverse proxy that acts as a manager for the servers and as a placeholder for connecting clients. You can setup multiple minecraft servers at a time, the manager part will put the servers to sleep if no one connects to them. When a client attempts to connect to a server that is not running, the proxy will show a placeholder while the server is starting up.
Infrared
Infrared is a reverse proxy for Minecraft that can automatically stop and start docker containers. It uses the minecraft protocol to give feedback to users when they attempt to connect. For example, Infrared can be configured to give a message to the user when they attempt to connect to a server that is not running. The message can be displayed as a MOTD (Message Of The Day) in the servers list, and show a different or the same message when the user attempts to connect to the server.

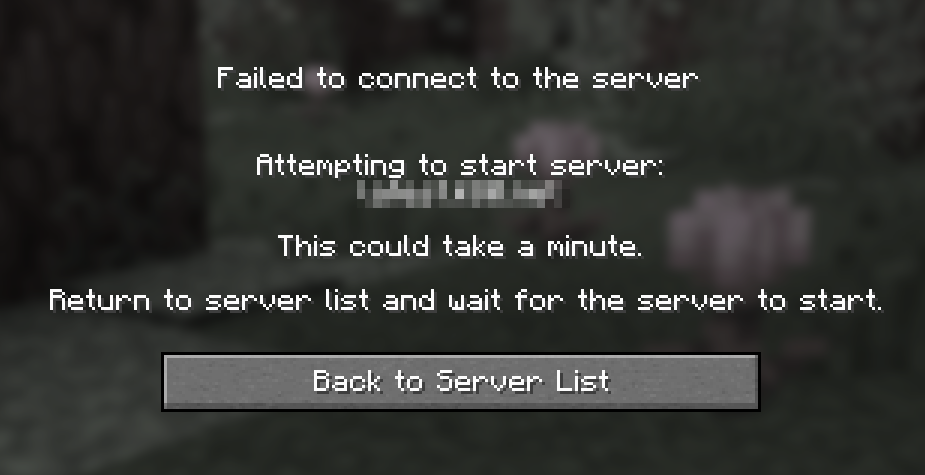
Then when the user connects, Infrared will attempt to start the server and the user can get a message.
Then after the server is started infrared will proxy the connection to the minecraft server:

When no player has been connected to the server for a customizable amount of time, the Infrared will automatically shut down the server so you can save the resources.
NOTE: The latest version of Infrared, V2.0.0, does not currently support the docker control features showcased in this article, we will be using V1.3.4
Configuration
So you're excited about this and want to set it up for yourself. The first step is to setup Infrared and a minecraft server as docker containers. You can use the docker CLI directly for this docker run etc. But I prefer the more declarative docker compose way of doing it. So you will need a linux machine running docker and docker compose. Next step is to create a compose.yml file that will serve as the configuration of our minecraft servers and infrared.
name: mc

services:
  infrared:
    image: haveachin/infrared:1.3.4 # V2 currently doesn't support stopping/starting docker containers
    container_name: mc-infrared
    volumes:
      - "./configs:/configs" # Infrared server configs
      - "/var/run/docker.sock:/var/run/docker.sock" # Mount the docker daemon socket file into the container so that Infrared can control docker from within the container.
    ports:
      - "25565:25565"
    restart: unless-stopped

  latest:
    image: itzg/minecraft-server
    container_name: mc-latest
    environment:
      TYPE: "PAPER"
      VERSION: "LATEST"
      EULA: "TRUE"
      MOTD: "Dumb server for dumb people"
    volumes:
      - "./data/latest:/data" # Mount server data to local directory (optional)
This setup assumes the folder structure:
.
├── compose.yml
├── configs
└── data
    └── latest
So if you haven't already then run:
mkdir configs
mkdir -p data/latest
Next we need to create the config files for infrared. Infrared requires one config file per server you want to use with Infrared. These are JSON files that provide info about the server like the domain name, docker container name and placeholders. By providing docker info we opt in to the features of Infrared being able to automatically stop them.
Create a new file in the configs directory.
It doesn't matter what the file is called, but let's call it latest.json to match the name of the minecraft server.
latest.json:
{
        "domainName": "latest.<YOUR_DOMAIN_HERE>",
        "proxyTo": "latest:25565",
        "disconnectMessage": "Attempting to start server:\n {{domain}} \n\n This could take a minute. \n\n Return to server list and wait for the server to start.",
        "docker": {
                "containerName": "mc-latest",
                "timeout": 300000
        },
        "offlineStatus": {
                "versionName": "1.20.2",
                "motd": "Server is offline - connect to start"
        }
}
Here's what the different fields mean:
domainName: The domain name that players will connect to in order to reach the minecraft server.
proxyTo: The domain that the proxy will send connections to, in this case the name
latestis intercepted by the Docker DNS service and redirected to the container of that name. This only happens because the container are running on the same docker network, this happens implicitly only because they are defined in the same compose file.disconnectMessage: The message the player will get if they attempt to connect to a server that is offline. There are some different templating values that you have access to here through the
{{...}}syntax. Here we just use the domain, which will be the value from thedomainNamefield.docker
containerName: The name of the container as seen in
docker ps. Note that because we set the name incompose.ymlwe have full control of that name, if we removed the name field on the container it would by default be calledmc-latest-1timeout: The amount of time in milliseconds that the container should be unused, no connections, before infrared will shut it down.
offlineStatus
versionName: The version of the server that appears on the placeholder when the server is offline
motd: Message Of The Day, the text that appears on the server list screen in the minecraft client on the placeholder
If you start the compose project now, using docker compose up, you'll notice
that both infrared and the minecraft server will start up. The minecraft server
will never shut down because infrared does not think it is running. There are a
couple of ways to fix this, but we'll look at maybe the simplest one which is
to build all the containers in the file, but only starting up one: Infrared.
docker compose create;
docker compose up infrared;
Let's put that in an executable shell script:
echo '#!/bin/sh
docker compose create;
docker compose up infrared;' > run.sh;
chmod +x run.sh
Conclusion
And there you go, you now have a simple declarative setup and framework for hosting multiple minecraft servers at the same time, while minimizing the resource usage.
The final directory structure looks like this:
.
├── compose.yml
├── configs
│   └── latest.json
├── data
│   └── latest
│       └── <MINECRAFT_SERVER_FILES>
└── run.sh
To run the servers you simply need to run:
./run.shNow players should be able to connect to your domain and play! To add more
servers you simply need to add another service in the compose.yml file, add a
config JSON file to the configs directory and add a folder for the server data
under data.
Here is a link to the setup that was created in this article: Example configuration (Single server) The repository also includes a version of the actual server setup that I use, to show how you can add more servers easily: Multiple servers
I hope this article left you with a good recipe for keeping minecraft servers available for years to come. Now you are prepared for when the next two week minecraft phase inevitably comes along once again.
If you run other types of game servers and are curious to get something similar working for them, check out my project Timid. Which is a tool similar to infrared that should work for most game servers.